
There’s been a lot of talk lately about Google hangouts and the SEO advantages of hosting a Google hangout and using this as a source of engagement with your followers and customers.
Let’s just analyse this new piece of the SEO pie for a moment before we continue.
Firstly, some ingredients that make for great SEO

If the above are the core ingredients for SEO domination then Google Hangouts is the special ingredient that binds them all together.
All sounds delicious right? So where’s the cookbook?
The following is a detailed account of what I have found to be the perfect recipe for hosting a Google Hangout on Air and, if executed correctly, can offer a vast improvement to your SEO. It includes the steps and 10 tips on how to use Google Plus Hangouts.
So where do we start?
What is a Google Hangout?
There are two types of Google Hangouts, Hangouts and Hangouts on Air. Hangouts are more of an engagement tool with friends, very much like Google chat and Skype. What we’re focussing on in this post is Google Hangouts on Air.
Simply put, a Google Hangout on Air is a great alternative to expensive webinar solutions where you and up to 9 guests can hangout and discuss whatever topic takes your fancy and broadcast that conversation to the rest of the world.
Your Google Hangout on Air is automatically broadcast live to both your Google+ home page and YouTube channel for the world to see.
Step 1: Setting Up and Promoting a Hangout
TOP TIP 1: SETUP AND OPERATE THROUGH YOUR GOOGLE+ BUSINESS PAGE
Always use your business page rather than your personal page, this is the equivalent of using your Facebook business page to promote your business rather than your personal account.
First things first, you’re going to need to follow a few pointers from Google to make the most of your Google Hangout on Air experience;
Google recommend using Chrome as your browser when running a Hangout on Air although from my experience all the popular web browsers will work perfectly well with no degradation of service.
You’ll also need to link a YouTube channel with your Google+ account before starting a Hangout on Air. This is very straightforward and you’ll be prompted to do this when you first start testing with Hangout on Air.
Finally you and your guests will need the Hangouts plugin, which again you’re prompted to do when you first launch a Hangout.
N.B You may need to open the plugin once downloaded to begin the installation even though the status on screen states ‘initialising’ – this seems to be a small bug.
TOP TIP 2: USE GOOGLE+ COMMUNITIES TO CREATE A UNIQUE CIRCLE
Take a look at the Google Communities from the drop down menu on the left hand side of your Google+ page and search for communities where your future followers are likely to hangout.
Google+ allows you to create a number of different Circles where you can include as many people as you like. Ensure you take full advantage of this and create a new Circle specific to the people you want to engage with on your Hangout and then start searching for these people.

If I’m running a Hangout on Air to talk about Social media for example, I’m going to search for this term within the Communities’ page, this returns nearly 200 different groups with some groups having in excess of 65k members.
Clicking on the community you’re interested in takes you to their News Feed and on the left hand side you’ll see the number of public members in the Community. Click on this and start adding these people to your new Circle.
TOP TIP 3: GIVE YOURSELF AS MUCH TIME AS POSSIBLE TO BUILD CIRCLES
Google will limit the number of people you can add to a Circle daily, so give yourself as much time as possible before the Hangout is scheduled to add people to your Circle.
TOP TIP 4: CREATE AN EVENT ON THE GOOGLE+ EVENT PAGE
In order to be able to invite people in your new Circle to the Hangout on Air you need to create an event.
This is found on the left hand side drop down box under events.
Click Create Event.
This is where you place all of the important information about the event/Hangout,
time, date etc.
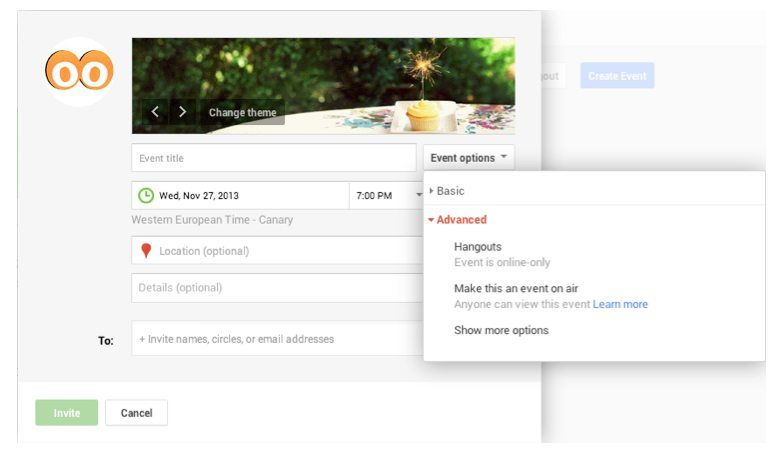
You also need to give the event a title, try and make this as inviting and specific as possible to intrigue and encourage people to attend the event.
Be sure to upload your own banner promoting the event. Make sure it’s eye catching and unique. This needs to be at least 1200×300 dpi. A good example of a banner design is below as is clear, concise and provides the relevant and important points of the Hangout.

Now you want to invite the Circle you’ve spent all that time building out. This invite will be sent to all those in the Circle, so again the more time you can spend building out the Circle, the larger the potential audience for your Hangout.
By inviting people in this way, those that accept the invite will be sent an email reminder shortly before the Hangout is due to air with a link taking them to your YouTube channel where the Hangout will be streaming live.
Finally, under event options, you need to make sure that you’re marking the event as ‘on air’ – this is found under ‘advanced’.
You can also select ‘show more options’, which allows you to add your own website URL (this will become important and apparent later).
The single most important part of hosting a Google Hangout on Air is that you want as many people to view the event as possible so you need to make it easy for people to do so.
TOP TIP 5: PEOPLE DON’T NEED TO BE ON GOOGLE+ TO ENJOY YOUR HANGOUT
It’s a popular misconception that only people with a Google+ account or within your circle can view the Hangout. This simply isn’t the case. You only need to have a Google+ account if you are a guest actively participating the Hangout rather than someone just viewing the Hangout.
This is perhaps the most important tip I’m giving on this entire blog.
With that in mind it’s important to drive people to a single location to view the hangout.
When inviting people from outside Google+ I’d suggest sending them to a dedicated page on your website or blog where you’ll embed the YouTube video prior to ‘going live’. How to do this is explained below.
Step 2: Starting the Hangout
So everyone’s invited, you’ve got 1000’s of people responding and saying how excited they are to hear what you have to say and the big day’s arrived what do you do?
TOP TIP 6: PRACTICE, PRACTICE, PRACTICE!
Google Hangouts, although highly effective, isn’t the most intuitive piece of software that Google has ever released. It’s important that you’re comfortable with the inner workings way before the live Hangout takes place.
Work with friends, family and colleagues to test the invites, software, features and functionality as much as possible before the Hangout date.
TOP TIP 7: BE ORGANISED PRIOR TO THE HANGOUT
Make Sure you enter the Hangout at least 15 to 30 minutes before it’s due to start.
Find ‘Hangouts’ under the ‘Home’ drop down box on the left hand side, from here click ‘Start a Hangout on Air’.
Give your Hangout the same name as you did the Event to ensure continuity and avoid confusion.
Don’t add anyone at this time.
As a general rule of thumb, I’ll open up the Hangout 30 minutes prior to the event actually starting. This gives me time to complete the following steps:
1. Grab your Video URL to embed on your Website/Blog
First things first, make sure you grab the YouTube URL of your Hangout so you can embed this within the dedicated page of your blog/website or wherever you are driving your viewers to watch the Hangout. The URL can be found at the bottom of your Hangout screen.
2. Ensure your camera, sound and lighting are all working correctly.
You can check all of this at your end, but it doesn’t hurt to invite a colleague or friend onto the Hangout at this point to do some last minute video/sound quality checks for the people on the other side of the Hangout.
Use headphones and encourage all your guests to do this same. This will improve the sound quality massively for those watching the broadcast.
Shut down all other applications that may interference and call degradation (Skype, Spotify, etc.).
3. Ensure that the apps you want to use on the Hangout are active.
There’s a whole host of apps that you can use to enhance your Google Hangout on Air experience, too many to discuss in this blog, however the two that I feel are essential requirements for your Hangout are the Hangout toolbox and the Q&A app.
The Hangout Toolbox allows you to use the lower third of the screen to promote your business and the hangout topic, in much the same way you’d see on a news channel. This is a great feature and adds professionalism to your Hangout. You can create your own custom overlay, this needs to be a 640×360 transparent .png file which can uploaded via the hangout toolbox.
The Q&A app allows those people watching from your Google+ home page or YouTube channel to type a question to you and your guests. This is a great way to interact with your viewers, people like nothing more than a ‘shout out’ during a live broadcast and this helps to encourage engagement.
Ensure you play around with these apps on your test Hangouts to get a good understanding of how they work and function.
TOP TIP 8: MAKE SURE YOU INVITE GUESTS USING THE CORRECT EMAIL ADDRESS AND ENSURE YOU RESIDE WITHIN THEIR CIRCLE

It sounds obvious, but as most people have more than a single email address nowadays you need to make sure you use the email address that your guest used to create their Google+ account.
If you use a different address or your guest does not follow you, you won’t be able to invite them to the call.
Invite your guests into the ‘Green Room’
Guests are not automatically placed into the Hangout on Air – you need to invite them.
I like to invite my guests around 15 minutes before the Hangout is due to start. This gives me time to make any necessary introductions and allows everyone to get settled and relaxed before going ‘on air’.
To do this, hover over the top of the screen where the required option is presented.
GET READY TO GO ‘ON AIR’ – SMILE AND HIT THE START BROADCAST BUTTON!!

Step 3: During the Hangout
TOP TIP 9: UNDERSTAND YOUR ROLES DURING THE HANGOUT
During the Hangout, you become the Host, Cameraman, Sound Technician and Production Assistant so it’s important that you’re confident on how to control these features before you go into your Hangout on Air and again, the best way to do this is to play around and experiment beforehand.
However, remember that this is a ‘live Hangout’, people won’t judge you for not being perfect, you’re not making a blockbuster movie and mistakes simply help you engage more with the viewers and makes the whole experience that more personal. The most important part is the content so keep this flowing as best you can.
Depending on the number of guests you have on the Hangout, it might be appropriate to mute their microphones until it’s their time to speak. The last thing you want is everyone talking at the same time.
This is done on the bottom of the screen, in the area called the ‘film strip’ that shows the video image of your guests.
From here you can also manage what the viewers see. By default the software will switch to the camera picking up the dominant sound, this can sometimes be overly sensitive, so I’d advise you to manage this yourself. Simply click on the guest you want the viewers to see.
Throughout the call, carry out screen grabs using your computer at appropriate times so these can be used for post promotion after the event.
Step 4: After the Hangout
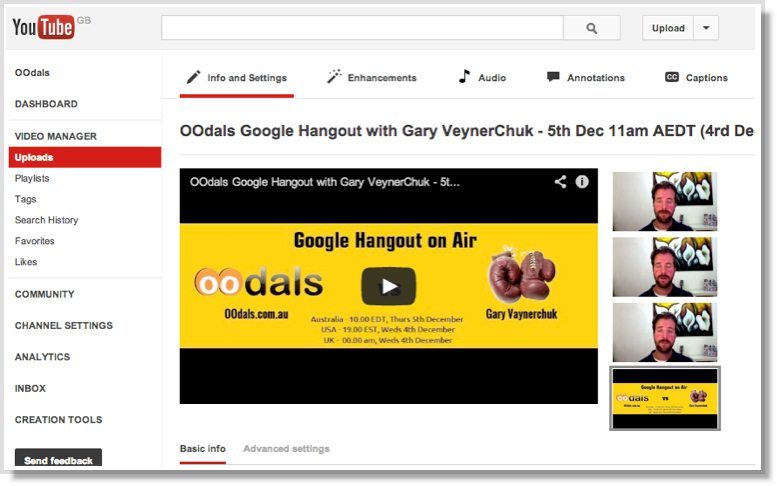
After the event take the opportunity to optimise and edit your video through the YouTube video editor on your YouTube Channel. Add appropriate keywords for SEO purposes ensuring the most relevant are used first. Add annotations and edit the Hangout as necessary.
TOP TIP 10: DON’T STOP PROMOTING THE HANGOUT SIMPLY BECAUSE IT’S OVER
Continue to promote the success of the event through the usual social media channels using the screen captures caught during the Hangout and snippets of video.
I’ve quickly had to come to grips with all of the above as I’m talking with Gary Vaynerchuk this Wednesday about his new book Jab, Jab, Jab, Right Hook – come along (blog.oodals.com.au) and see how all of the above can come together to give you great unique content and the SEO equivalent of a quart of rocket fuel to push you up the Google rankings.
Guest author:Gregg Lander advises businesses and individuals how to integrate with Marketplace platforms, consults on Social Media and marketing strategies and is Managing Director at OOdals. A company dedicated to donating 10% of all sales to charities worldwide.
The post 10 Tips on How to Use Google Plus Hangouts appeared first on Jeffbullas’s Blog.